This post may contain affiliate links. As an Amazon Associate, I earn from qualifying purchases. Doing so allows me to create more unique content and recipes for you.
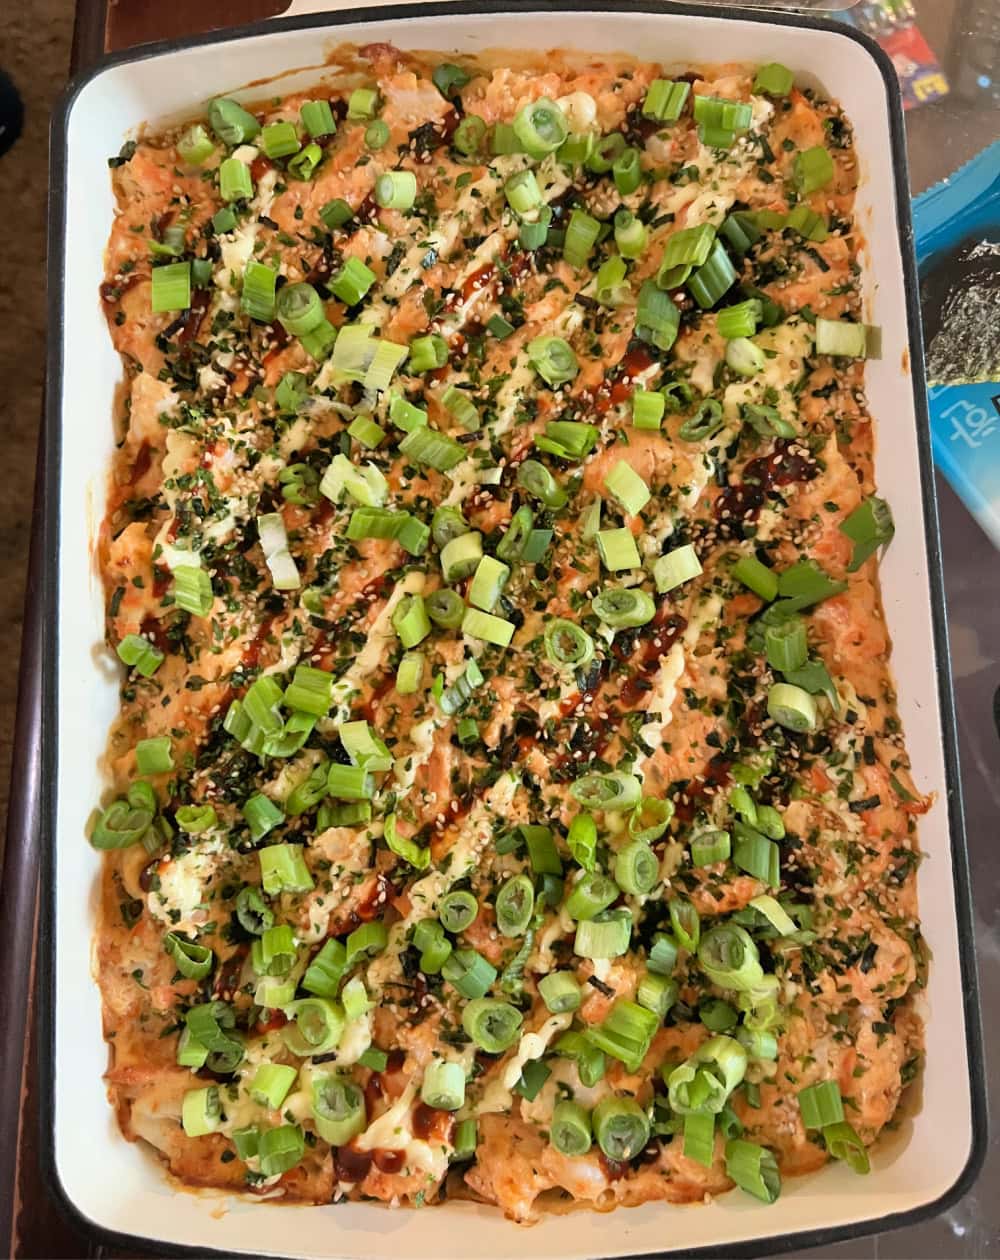
Skip the $100 sushi dinner tab and make this Viral TikTok Sushi Bake Recipe at home instead! This easy deconstructed casserole layers seasoned sushi rice with creamy spicy salmon and shrimp (or you can subsitute crab), all topped with a sriracha mayo drizzle that broils to bubbly perfection. Serve it family-style with crispy nori sheets for scooping—no rolling skills required!
Join my newsletter and never miss a recipe!
Why You'll Love This Sushi Bake Recipe
- 💸 ALL THE FLAVOR FOR A FRACTION OF THE PRICE
"Remember that $100 sushi tab? Yeah, never again. This recipe feeds at least four people for what you'd spend on TWO rolls at a restaurant. Your wallet will finally stop crying every time you crave sushi." - 👩🍳 ZERO SUSHI ROLLING SKILLS REQUIRED
"Can't roll a sushi roll to save your life? Same. This deconstructed genius lets you layer everything in a pan, bake it to bubbly perfection, and scoop it up with nori sheets. No special equipment. No stress. Just deliciousness." - 🎨 ENDLESS CUSTOMIZATION POSSIBILITIES
"Want spicy crab in one section and salmon in another? Go for it! Craving different sauces? Drizzle away! You can even add raw sushi-grade fish on top after baking to create your favorite specialty rolls without any of the work. This recipe BEGS you to get creative." - 🏆 IT'S VIRAL FOR A REASON
"TikTok didn't steer us wrong on this one. Thousands of home cooks (including your fave—me!) have tested and tweaked this recipe to perfection. When a trend is THIS delicious, it's worth jumping on board."
In This Post
🍣 Why This Sushi Bake Became Our New Date Night Tradition
After what felt like an eternity without sushi, my husband and I finally decided to treat ourselves. We were giddy scrolling through our local sushi spot's online menu, adding roll after roll to our cart. Spicy tuna? Yes. Salmon avocado? Obviously. A fancy specialty roll with names we couldn't pronounce? Don't mind if we do!
Then came the moment of truth: checkout.
Over $100. For four rolls and miso soup. BEFORE delivery fees and tip.
I literally choked. Like, audibly gasped. But you know what? We really wanted that sushi date night at home, so I swallowed hard, hit "place order," and spent the next hour trying not to think about our bank account.
The sushi was delicious. The regret? Also delicious. 😅
That's when my mission began.
I needed to find a way to satisfy our sushi cravings without breaking the bank. But here's the thing—I am deeply skeptical of "cheap sushi" after a traumatic experience I won't go into here. (Let's just say... ewwwwww. Never again.)
So homemade it was going to be.
Enter TikTok. If you've been on social media lately, you've probably seen the viral sushi bake videos taking over everyone's For You pages. At first, I was skeptical. A baked casserole version of my beloved sushi rolls? Could it possibly deliver the same creamy, spicy, umami magic?
Spoiler alert: it absolutely does.
After some tweaking to get the flavors exactly where we wanted them, this recipe was born. The first time I pulled that pan out of the oven, with the sriracha mayo bubbly and golden on top, my husband walked into the kitchen and asked, "What smells so good?"
One bite in, he was hooked. Two bites in, he asked when we could have it again.
Now sushi bake night is our new favorite thing.
And I've already got big plans for next time. I'm going to get creative and section the pan off into rows, each topped with different ingredients—spicy crab here, salmon there, maybe even a Rainbow roll section. Different sauces for different sections. Different vibes for different bites!
The best part? You could even add thin slices of raw, sushi-grade fish on top after baking to create your favorite specialty rolls without any of the rolling stress. It's like a DIY sushi bar in casserole form.
So if you love sushi but hate those sky-high restaurant prices, welcome to the club. Grab a pan, some nori sheets, and let's make something beautiful together. Your wallet—and your taste buds—will thank you. 🍱✨
🍽️✨ Don't forget to share your delightful creations with us on BlueSky using #BobbisKozyKitchen for a chance to be featured in our newsletter! 📸
🥘Sushi Bake Ingredient Notes
Here, I explain the best ingredients for my Sushi Bake recipe, what each one does, and substitution options. For the exact measurements, see the recipe card below.
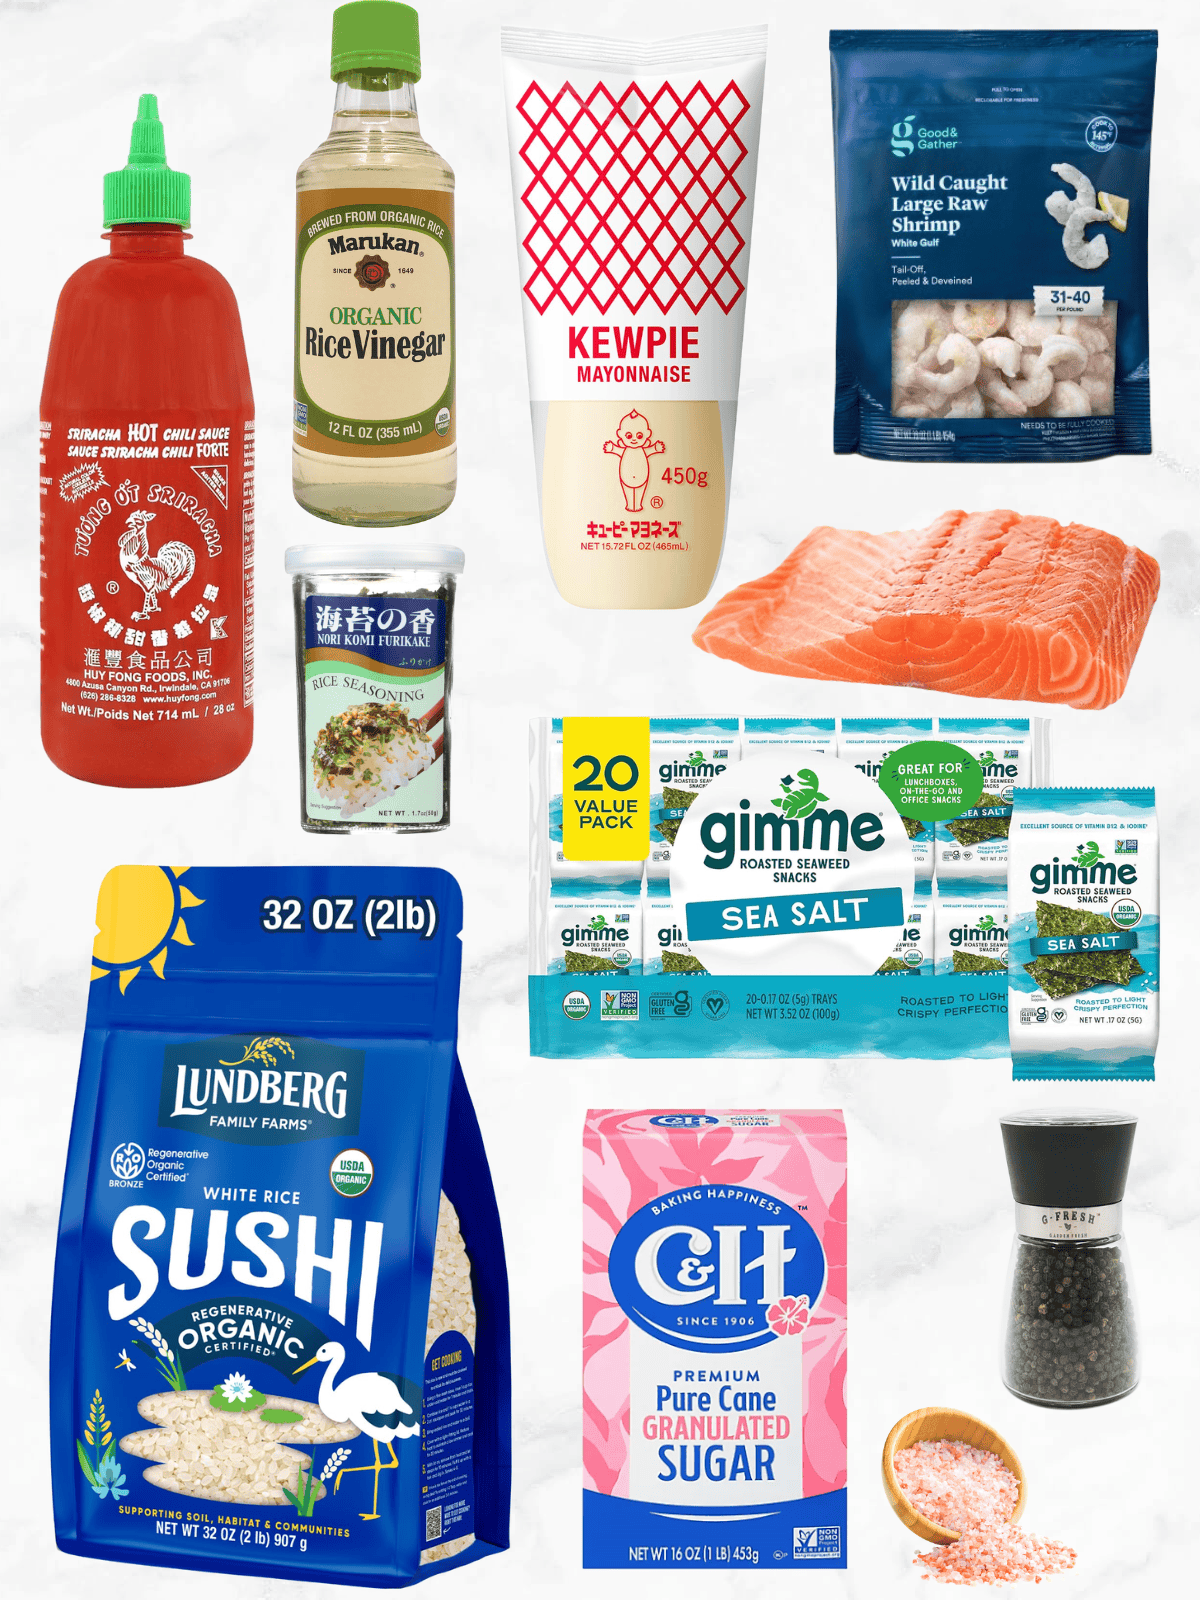
- 🍚 Sushi Rice – The sticky foundation! Sub: Short-grain white rice works in a pinch, but sushi rice gives that authentic sticky texture.
- 🍶 Rice Vinegar – Mild, slightly sweet acidity that defines sushi rice. Sub: Apple cider vinegar mixed with a pinch of sugar (but trust me, rice vinegar is worth it!).
- 🧂 White Sugar + Salt – Essential for seasoning the rice. Sub: For sugar-free, use monk fruit sweetener (dissolve well!).
- 🦐 Shrimp – Chop 'em small for even distribution! Sub: Imitation crab or real lump crab meat (fancy upgrade!).
- 🐟 Salmon – Cook it simply! Tip: Air fry or bake with just salt and pepper. Sub: Canned salmon (drained well) or tuna in a pinch.
- 🧀 Cream Cheese – The creamy secret weapon! Room temp is NON-NEGOTIABLE for smooth mixing. Sub: Dairy-free cream cheese works beautifully.
- 🥪 Kewpie Mayo – The Japanese mayo magic! It's creamier and tangier than regular mayo. Sub: Regular mayo + a tiny splash of rice vinegar (but Kewpie is worth hunting down).
- 🌶️ Sriracha – For that spicy kick! Sub: Any chili garlic sauce or gochujang for different vibes.
- 🌸 Furikake – The umami sprinkle! This Japanese rice seasoning typically contains seaweed, sesame, and dried fish. Sub: Toasted sesame seeds + crushed nori + pinch of salt.
- 🌊 Seaweed Snacks – For scooping! Those little snack sheets are perfect. Sub: Toasted nori sheets cut into squares.
- 🌱 Toasted Sesame Seeds – Optional but gorgeous! Sub: Everything but the bagel seasoning for extra crunch.
- 🌿 Green Onion – Fresh pop of color and mild onion flavor. Sub: Chopped chives in a pinch.
The printable recipe card at the bottom of the page contains a detailed list of measurements and instructions.
Storage and Reheating
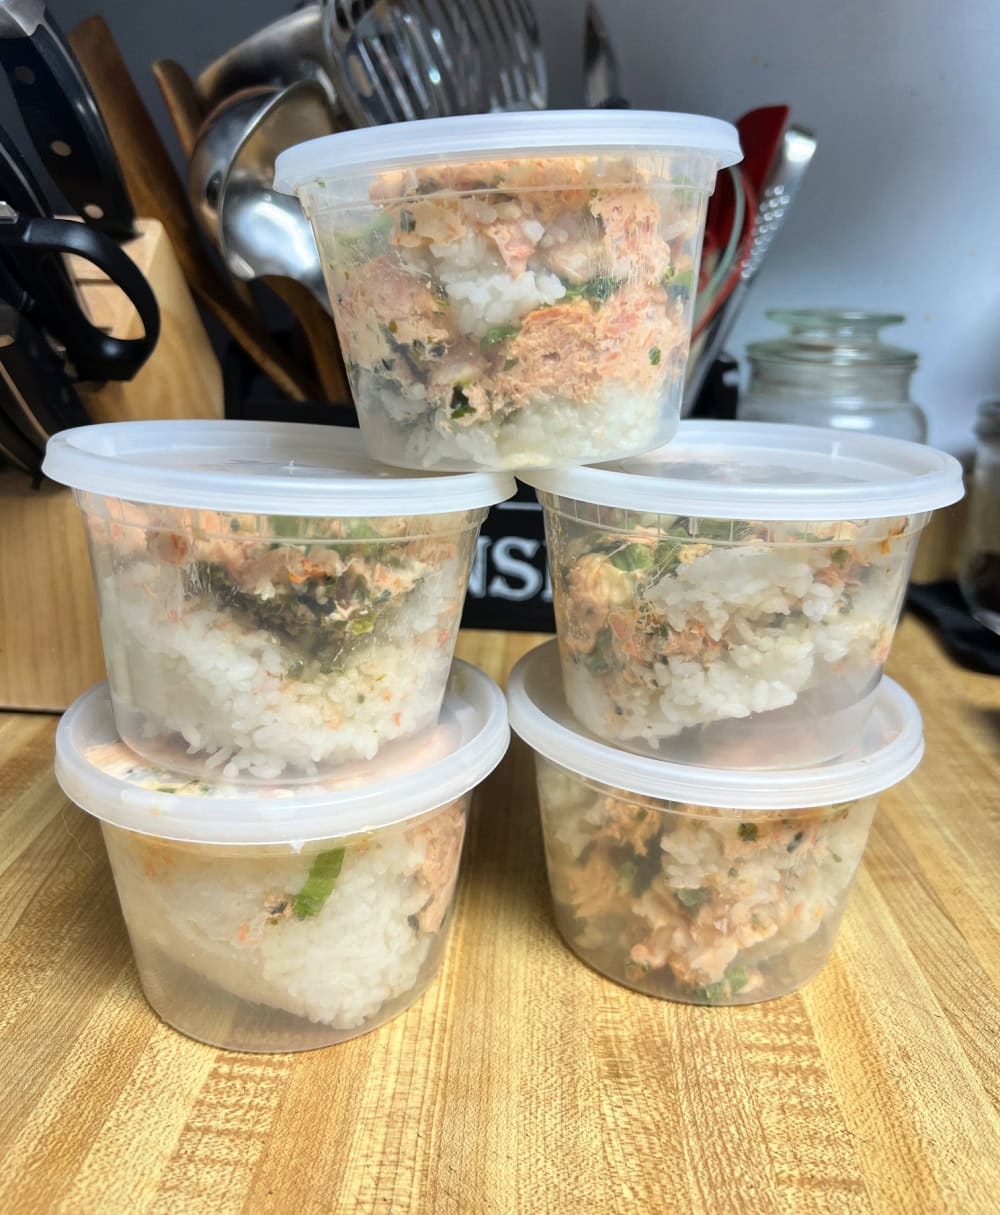
✅ Fridge: Transfer leftovers to an airtight container (these 2-cup restaurant containers are PERFECT (think lunches)—one per serving!). Store for up to 3 days .
✅ Pro Tip: Press plastic wrap directly onto the surface before sealing to prevent a skin from forming on top.
REHEATING METHODS:
🔥 Oven Method (BEST for crispy toppings!)
- Preheat oven to 350°F
- Place desired portion in an oven-safe dish
- Cover loosely with foil (to protect those gorgeous toppings)
- Heat for 10-15 minutes until warmed through
- Remove foil for the last 2-3 minutes if you want that bubbly, golden top again
⚡ Air Fryer Method (Quick & crispy!)
- Preheat air fryer to 325°F
- Place portion in an air fryer-safe container or basket
- Heat for 5-7 minutes until warmed through
- Check halfway through
❄️❄️ FREEZING INSTRUCTIONS
CAN YOU FREEZE SUSHI BAKE?
Yes! Sushi bake freezes surprisingly well. The key is doing it before baking for best results, but you can freeze leftovers too.
OPTION 1: FREEZE UNBAKED (BEST METHOD)
- Assemble the sushi bake completely in a freezer-safe baking dish (glass or aluminum works great).
- Wrap tightly with a layer of plastic wrap, then a layer of foil.
- Label with date and contents.
- Freeze for up to 2 months.
To bake from frozen:
Broil briefly for that golden top!
Thaw overnight in the refrigerator
Remove plastic wrap, keep foil on
Bake at 375°F for 20-25 minutes
Remove foil, bake 5-10 more minutes until bubbly
💡 PRO TIPS:
- Cold is actually WONDERFUL! Day-old sushi bake eaten cold is legitimately delicious—the flavors meld together beautifully overnight!
- Add fresh garnishes after reheating: A sprinkle of fresh green onions or an extra drizzle of sriracha makes it feel brand new .
- Don't microwave! It can make the rice gummy and the toppings sad and soggy .
My recommendation? Enjoy it cold (seriously, it's so good that way), but when you want it warm, the oven or air fryer is your best friend!
💭My Recipe Tips (SUSHI BAKE SECRETS!)
🍚 RICE PERFECTION
- "Rinse until clear!" – Wash your sushi rice under cold water until the water runs clear. This removes excess starch and prevents mushy rice!
- "Fold, don't stir" – When mixing in the vinegar mixture, use a slicing folding motion so you don't break the rice grains.
- "Flat is where it's at" – Press the rice into an even layer in your baking dish. Uneven thickness = uneven baking!
🐟 PROTEIN PRO TIPS
- "Salmon don't overthink it" – Keep your salmon seasoning simple! Salt and pepper is all you need since the other ingredients bring tons of flavor.
- "Shrimp size matters" – Chop shrimp into small, bite-sized pieces so they distribute evenly throughout the bake.
- "Room temp cream cheese = NON-NEGOTIABLE" – Cold cream cheese won't mix smoothly and you'll end up with annoying white lumps. Trust me on this!
🌶️ FLAVOR CONTROL
- "Spice wisely" – Start with 2 teaspoons of Sriracha in the mixture, then taste. You can always add more heat with the final drizzle!
- "Kewpie is queen" – Don't substitute regular mayo if you can help it. Kewpie's creaminess and tang is part of the magic.
- "Furikake fatigue?" – Be generous! This seasoning adds umami magic that ties everything together.
🔥 BAKING LIKE A BOSS
- "Watch that broiler!" – The broiler goes from golden to GONE in seconds. Keep your eyes on it!
- "Let it rest" – Give the bake 5-10 minutes out of the oven before serving. It sets up nicely and won't burn eager mouths.
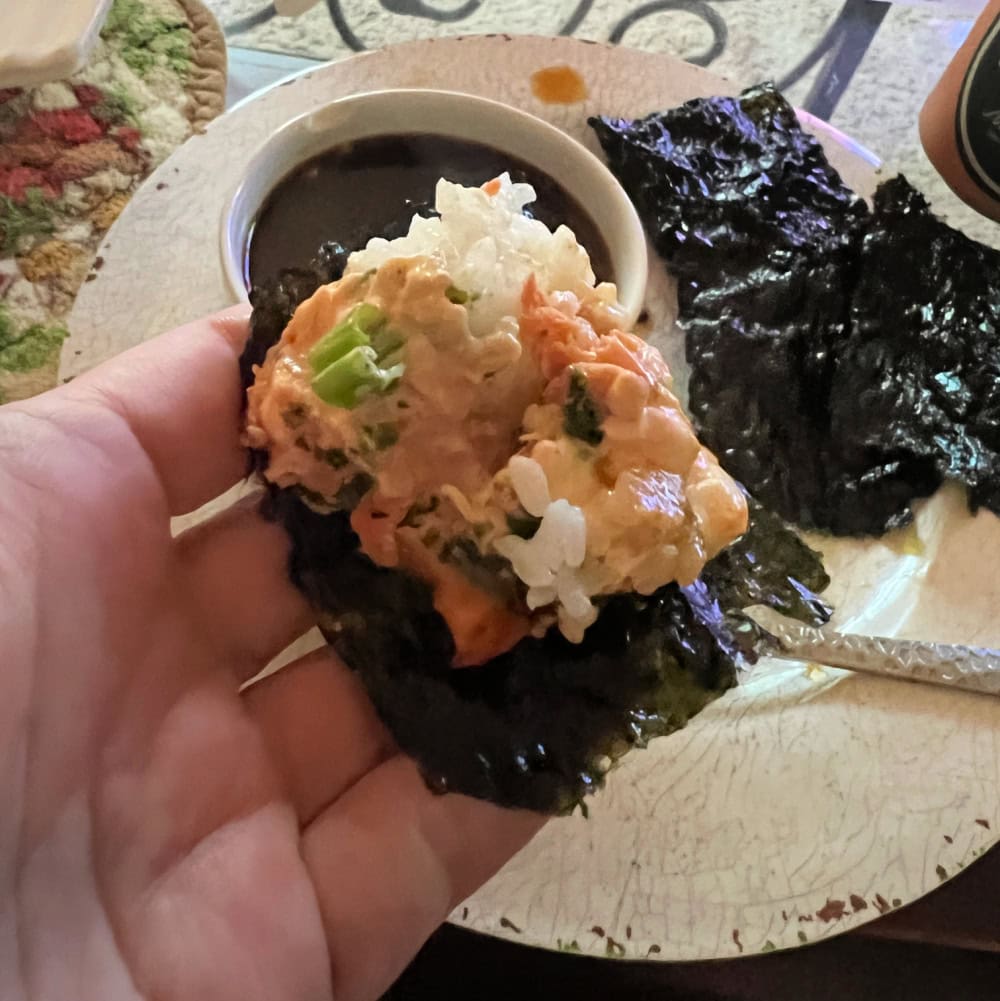
- "Serving style" – Set out a bowl of seaweed snacks and let everyone scoop their own. It's interactive and FUN!
⏰ TIME-SAVERS
- "Multitask magic" – Cook your rice and salmon at the same time. While they're doing their thing, chop shrimp and mix your filling!
- "Make ahead move" – Assemble everything the night before, cover and refrigerate, then bake when you're ready. Perfect for entertaining!
🚨 AVOID THESE MISTAKES
- Skipping the rice rinse = gummy, sad sushi rice
- Overmixing the filling = paste instead of texture
- Baking too long = dried out seafood (nobody wants that!)
- Soggy seaweed – Only scoop right before eating, or the nori gets chewy
💡 PRO CHEF MOVE:
"Section your pan! Next time, divide the rice into sections and top each with different ingredients—spicy crab here, salmon there, maybe even a California roll section with avocado. Different sauces for different sections = sushi bar vibes at home!"
FAQ about
Absolutely! This recipe is super flexible. Try tuna, cooked crab, imitation crab, chopped cooked shrimp, or even diced yellowtail. Just make sure any raw fish is sushi-grade if you're not cooking it first!
Short answer: Yes, for best results. Sushi rice's sticky texture is what holds everything together. Substitution: Short-grain white rice is your next best bet—long-grain rice won't stick properly and your bake will fall apart.
Yes! This recipe is naturally gluten-free if you check a few things: ensure your furikake is gluten-free (some contain soy sauce), use gluten-free soy sauce or tamari if adding any, and verify your sriracha brand is gluten-free (most are!).
It's customizable! With 2 teaspoons of sriracha in the filling, it has a mild warmth that most people enjoy. For sensitive palates, reduce to 1 teaspoon. For heat seekers, add more to the filling AND drizzle generously on top!
More Delicious Asian Recipes...


Viral TikTok Sushi Bake Recipe
Ingredients
- 2 cups uncooked sushi rice
- 2 tbsp rice vinegar
- 1 tbsp white sugar
- 1/2 tsp salt + more for seasoning
- 1/2 tsp cracked black pepper for the salmon
- 1 lb shrimp shells removed and chopped
- 1 lb salmon
- 4 ounces cream cheese room temperature
- 1/4 cup Kewpie mayo + more for topping
- 2 teaspoons Sriracha sauce or more to taste
- Furikake
- Seaweed snacks
- Toasted sesame seeds for topping (optional)
- 1 bunch green onion green section chopped
Instructions
- Cook sushi rice according to package instructions.*See Notes
- In a small saucepot, combine rice vinegar, sugar, and salt. Heat until sugar and salt are dissolved. Place the pot into a bowl of cold water to chill.
- Pour the vinegar mixture into the cooked rice and gently mix until well combined. Set the rice aside.
- Meanwhile season the salmon with salt and pepper. You can air fry it 400F for 10 minutes, or bake it in the oven at 400 for 12 minutes.
- In a large bowl, add the chopped shrimp and cooked flaked salmon. Then add the cream cheese, Kewpie Mayo, and Sriracha.
- Mix everything together until smooth and well combined. Taste and add more Sriracha if you want it spicier *See Notes
- Preheat the oven to 400F and prepare a 9x13 inch baking dish.
- Transfer the cooked sushi rice to the baking dish and gently press down to flatten it out.
- Sprinkle a generous amount of the furikake onto the rice, then top with the shrimp and salmon mixture. Gently press down and smooth the surface.
- Bake at 400F for 10-15 minutes.
- Broil for 3 to 5 minutes to get the top golden and bubbly, making sure not to burn it.
- Take sushi bake out of the oven. Top with drizzles of Kewpie mayo, Sriracha, furikake, toasted sesame seeds, and chopped green onions.
- To serve, scoop a spoonful of sushi bake and wrap it with seaweed snack.
Notes
We will be drizzling the top with more sriracha so don't go crazy unless you like it REALLY spicy!
Disclaimer
Most of my recipes are low-carb (or keto) and gluten-free, but some are not. Please verify that a recipe fits your needs before using it. Recommended and linked products are not guaranteed to be gluten-free. Recipes may contain errors, so please use your common sense when following them. Nutritional information is provided as a courtesy and is approximate only. We cannot guarantee the accuracy of the nutritional information given for any recipe on this site. Erythritol carbs will not be included as it has a glycemic index of 0 (meaning it does not spike blood sugar) and it’s not metabolized. Net carbs are the total carbs minus fiber.
Nutrition
Food safety
- Do not use the same utensils on cooked food, that previously touched raw meat
- Wash hands after touching raw meat
- Don't leave food sitting out at room temperature for extended periods
- Never leave cooking food unattended
- Use oils with a high smoking point to avoid harmful compounds
- Always have good ventilation when using a gas stove
See more guidelines at USDA.gov.
If you like this recipe, please leave a comment!
If you make this recipe, take a photo and share it on Instagram with the hashtag #BobbisKozyKtchn I love to see what you make. You might even make it into our newsletter!!
Thank you for reading and supporting the companies I partner with. Doing so allows me to create more unique content and recipes for you.
Dee
My daughter and I LOVED this recipe! It’ll be a lunch staple at our house.
bobbiskozykitchen
Yay!! I can't get enough of this! We make it at least twice a month!!